After completing sign up and adding members to project, you can access to management console and create network, key pair and instance.
You can refer to the following if you want to know more about the process after instance is launched.
*Process

Network tab
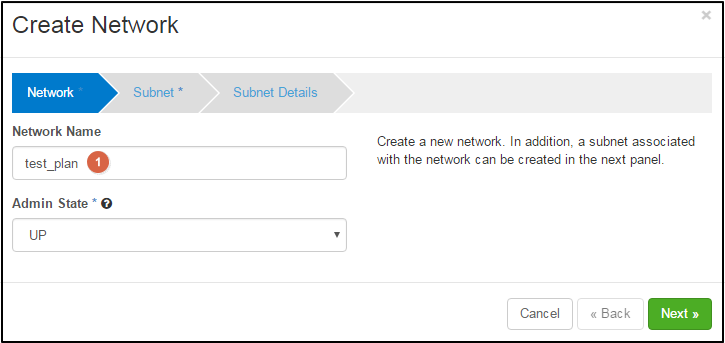
![]() Network name: Type a distinguishable name of network.
Network name: Type a distinguishable name of network.
Subnet tab
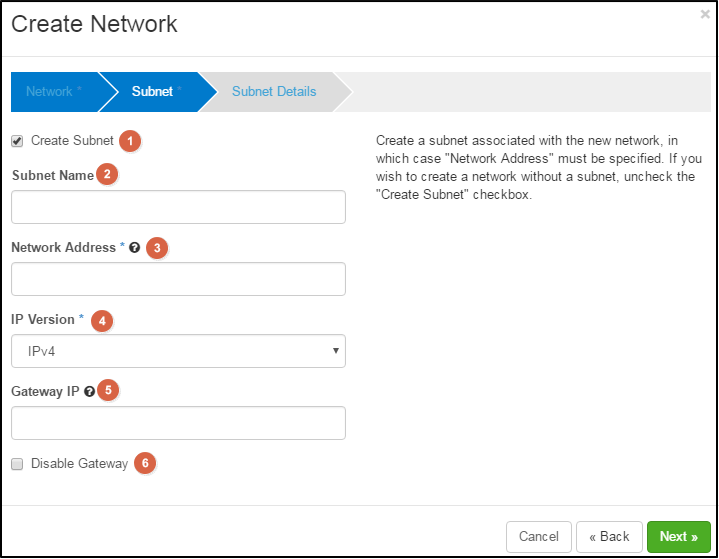
![]() Create subnet: Please select the check box to create a subnet.
Create subnet: Please select the check box to create a subnet.
If you wish to create a network without a subnet, uncheck the "Create Subnet" checkbox.
![]() Subnet name: Specify the name of subnet. In general, 192.168.0.0 or 10.0.0.0 is used as private bandwidth.
Subnet name: Specify the name of subnet. In general, 192.168.0.0 or 10.0.0.0 is used as private bandwidth.
![]() Network Address: Specify IP address of subnet.
Network Address: Specify IP address of subnet.
![]() IP Version: Select IPv4 or IPv6 as IP version.
IP Version: Select IPv4 or IPv6 as IP version.
![]() Gateway IP: This is optional. If you have a specific gateway you want to use, specify the IP address.
Gateway IP: This is optional. If you have a specific gateway you want to use, specify the IP address.
If you use the default, leave the blank
![]() Disable Gateway: If you don’t want use a gateway, check ‘Disable gateway’ box
Disable Gateway: If you don’t want use a gateway, check ‘Disable gateway’ box
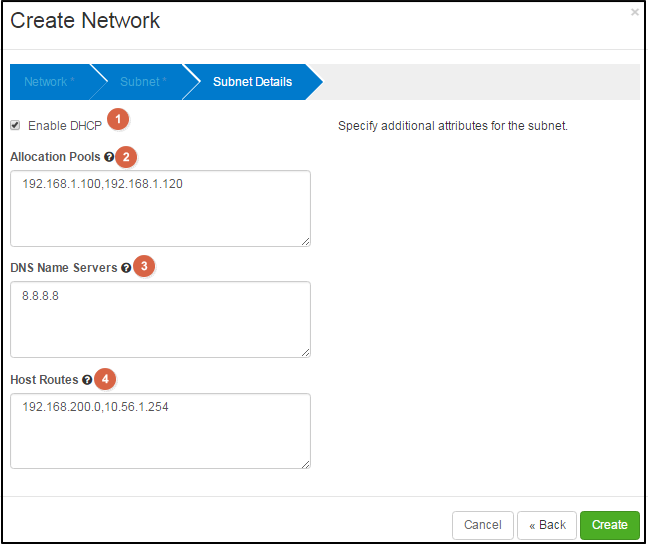
Subnet Details tab
![]() Enable DHCP: If you want use DHCP, select this check box.
Enable DHCP: If you want use DHCP, select this check box.
![]() Allocation Pools: Specify IP address pools. Each entry is: start_ip_address,end_ip_address (e.g.,168.1.100,192.168.1.120) and one entry per line.
Allocation Pools: Specify IP address pools. Each entry is: start_ip_address,end_ip_address (e.g.,168.1.100,192.168.1.120) and one entry per line.
![]() DNS Name Servers: Specify DNS name server for this subnet.(’ 8.8.8.8’ is the name server of Google)
DNS Name Servers: Specify DNS name server for this subnet.(’ 8.8.8.8’ is the name server of Google)
![]() Host Routes: Specify additional routers to the hosts.
Host Routes: Specify additional routers to the hosts.
Each entry is: destination_cidr, nexthop (e.g.,192.168.200.0/24,10.56.1.254) and one entry per line.
 button, you can see the page saying ‘creation is completed’;
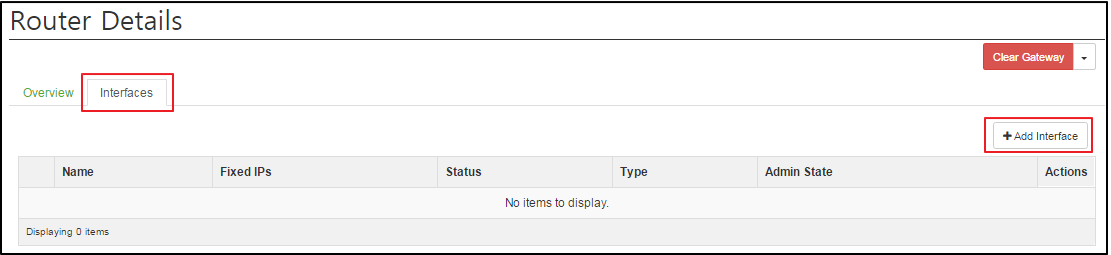
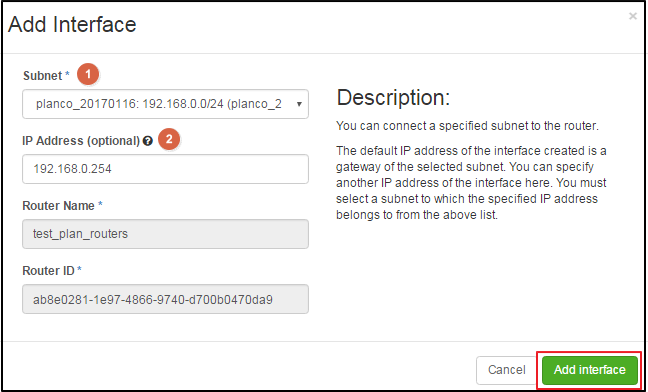
![]() Subnet: Select a subnet.
Subnet: Select a subnet.
![]() IP address: Type a ‘router interface- IP address’ of selected subnet.
IP address: Type a ‘router interface- IP address’ of selected subnet.
- If you do not fill this blank, the first IP address of the subnet will be used.
.
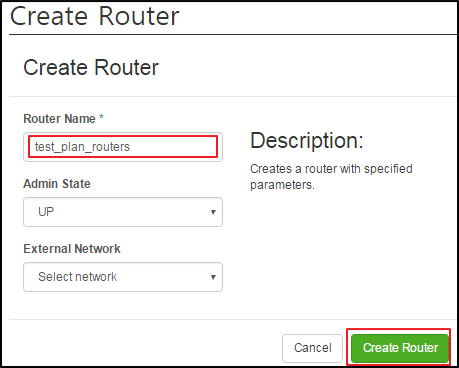
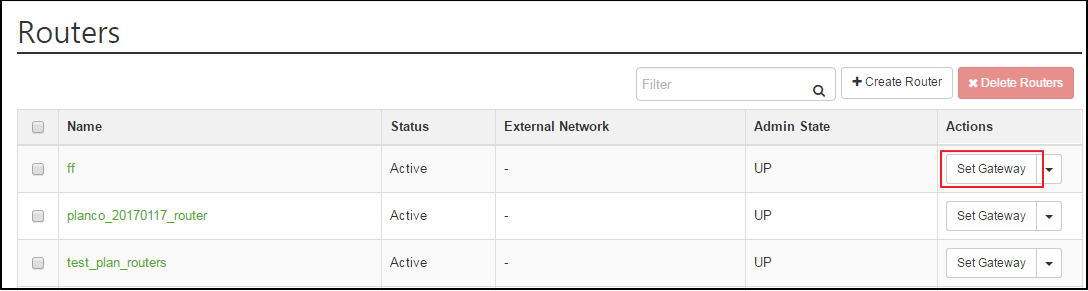
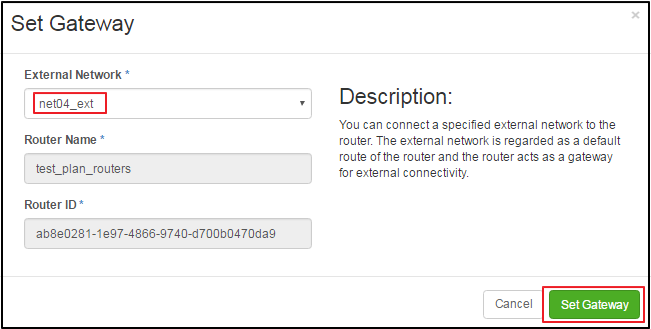
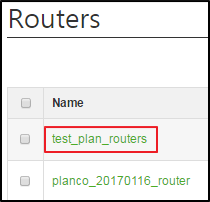
You can see the created router in ‘Network technology’ as well.
The router called ‘test_plan_routers’ has been created; this is connected to external network. (ext-net)
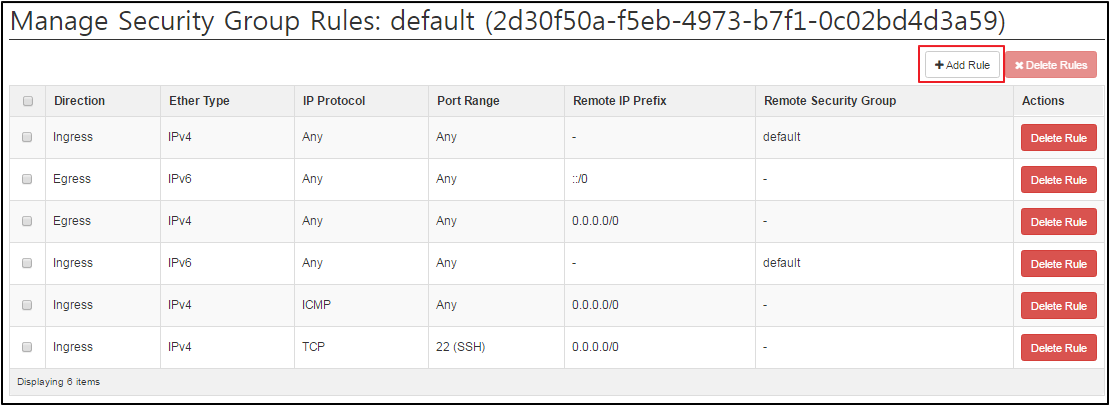
This process allow SSH and ICMP(Ping) to access to Instance.
Rules of security group apply to the all instances in the project and they must be set to each project, except in the case of preventing access using SSH and ICMP.
When you add rules, please specify the protocol being used for the destination port or source port.
 button after Project > Compute > Access& Security.
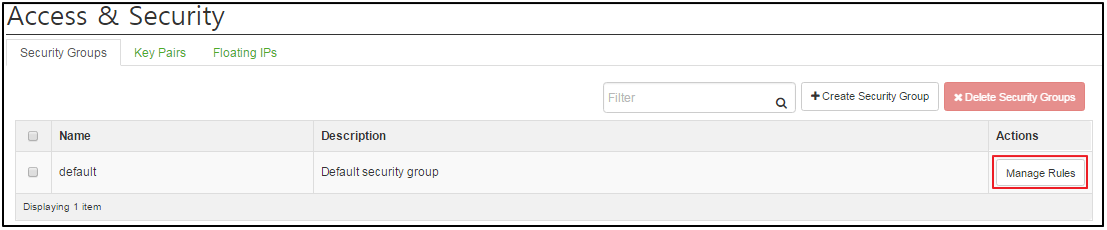
 button.
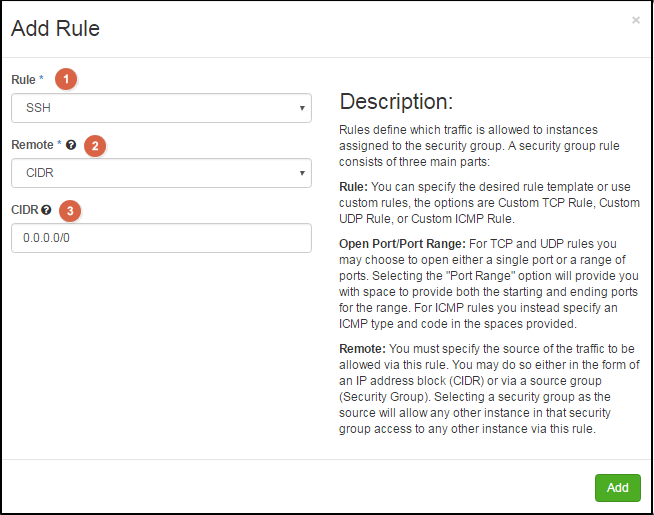
![]() Rule: Select SSH from the list.
Rule: Select SSH from the list.
![]() Remote: Select CIDR to specify the range of allowed security.
Remote: Select CIDR to specify the range of allowed security.
![]() CIDR: Type 0.0.0.0/0
CIDR: Type 0.0.0.0/0
- IP address to CIDR will be blocked to accept the request of specific range of IP address.
 button. As shown below, a new rule has been added, From now on, Instance receives requests of all IP address to open SSH 22 port.
![]()
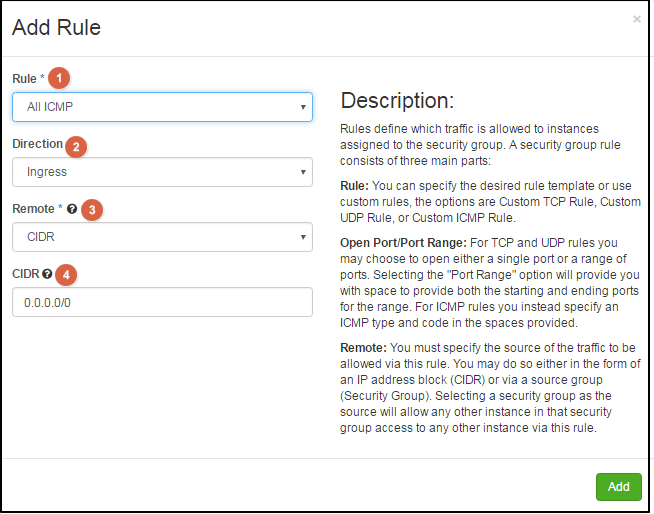
![]() Rule: Select ‘All ICMP’ from the list.
Rule: Select ‘All ICMP’ from the list.
![]() Direction: Select ‘Ingress’.
Direction: Select ‘Ingress’.
![]() Remote: Select CIDR to specify the allowed range of security.
Remote: Select CIDR to specify the allowed range of security.
![]() CIDR: Type 0.0.0.0/0.
CIDR: Type 0.0.0.0/0.
button. As shown below, a new rule has been added; From now on, the instance receives all ICMP packets.![]()
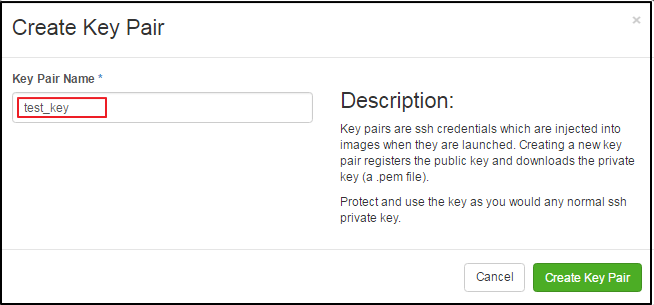
IXcloud utilizes a remote access with a key pair.
To prevent any risks for managing instance, you need at least one key pair for each project.
If not, you might have some problems when you manage instances.


You can select the size, image OS, network and a key pair for security.
 button after Project > Compute > Instance.
Details tab
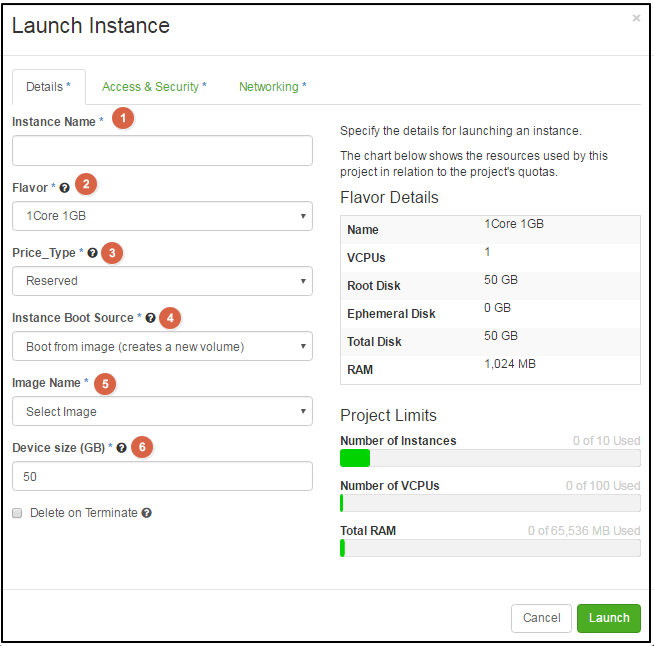
![]() Instance Name: Type an instance name.
Instance Name: Type an instance name.
![]() Flavor: Choose the size of image to launch.
Flavor: Choose the size of image to launch.
![]() Price Type: Select the price type ‘On demand/Reserved’
Price Type: Select the price type ‘On demand/Reserved’
![]() Instance Boot Source: Select from ‘boot from volume’/ ‘boot from image’/’boot from volume snapshot’.
Instance Boot Source: Select from ‘boot from volume’/ ‘boot from image’/’boot from volume snapshot’.
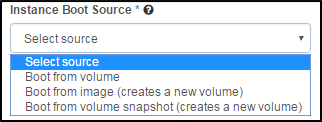
Boot from volume
You can choose the volume on the list at the bottom.
Boot from an image (creates a new volume).
Select the image on the ‘image name’ list at the bottom and specify the name with size to create a new volume.
Select the check box at the bottom if you want to terminate volume when you have finished instance.
Boot from volume snapshot (creates a new volume).
Select a snapshot on the list at the bottom.
Select the check box at the bottom if you want to terminate a volume when you have finished instance.
![]() Image name: You can choose an OS image that you want to boot.
Image name: You can choose an OS image that you want to boot.
![]() Device size: You can choose the size of volume you want to boot (Units 50GB).
Device size: You can choose the size of volume you want to boot (Units 50GB).
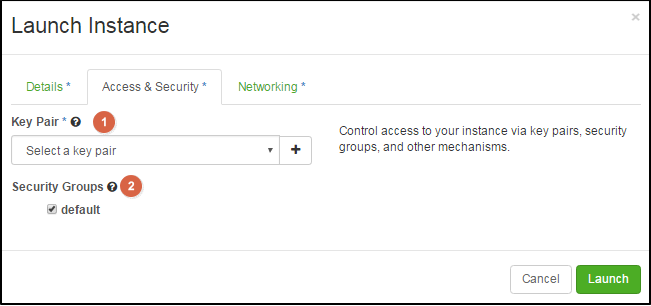
Access & security tab
![]() Key Pair: Choose from the created key pairs for authentication
Key Pair: Choose from the created key pairs for authentication
![]() Security Groups: You can enable the security group being allocated to instance.
Security Groups: You can enable the security group being allocated to instance.
- Security group performs functions like a firewall, defining network traffics to an instance.
If you have not created security groups, only default security group can be assigned.
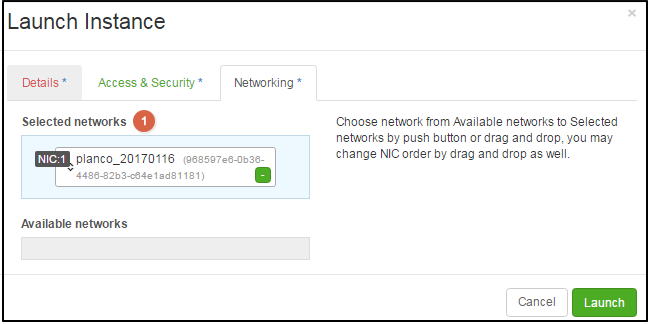
Networking tab
![]() Selected network: Choose a network from the available networks
Selected network: Choose a network from the available networks
On the instance page you can see the name, image name, IP address, size, details, etc.

|
KINX 21F, Gangnam Building, 396, Seocho-daero, Seocho-gu, Seoul, KOREA Service Inquiry : 02-526-0900(Press 1) Technical Inquiry : 02-526-0900(Press 2) |
|
|
|


